A SIMPLE TWT TESTER
Marko Cebokli S57UUU
Presented at the EME conference Prague 2002
ABSTRACT:
When one wants to get useful RF power from TWT's bought randomly at
fleamarkets and junkyards, the testing of these tubes usually presents a big
problem. A suitable power supply is seldom available, especially for the
more powerful tubes. Often these tubes are near (or beyond :-) the end of
their useful life, the focusing is degraded etc. Sometimes they can still
give useful power, provided one can experiment with them a little.
This paper describes a relatively simple device for testing and safe (for the
tube) debugging of TWT's with videly varying power requrements.
1. THE PROBLEM
Here are some of the problems the TWT experimenter encounters in his life:
- you've got a nice big tube but no power supply. Before starting to build
or otherwise invest in the big and complicated supply, it would be nice to
know if the tube works at all!
- you've got the tube and supply but no heatsink. A few hundred watts of heat
will fry the tube in seconds without a heatsink. How to test it?
- you've got everything, but the helix protection trips instantly when you
apply the power. Maybe only a slight adjustment of the voltages or a small
magnet would help, but how to find the solution without exposing your tube
and supply to the repeated stress of aborted switching?
- you've got an 'UFO' tube, no data, not even who the manufacturer is. Using
some tube sleuthing you can, with some confidence, find out which terminal
is which electrode, but how to find out what voltages to apply without
burning the tube out?
- you've got everything but that big RF dummy load. Now, you could hook up
that horn, but your neighbours brain has been washed with those fairy
tales about extremely dangerous microwaves...
2. PULSED TESTING
One solution to the above problems is to switch the tube on just for a few
(tens of) microseconds. For such a short time, it's possible to supply a
lot of power from a capacitor which is charged by a simple small low current
high voltage supply. Another advantage of using short pulses is that because
of the thermal mass of the tube elements, the maximum ratings of the tube
for continous operation can be exceeded by a big factor without endangering
the tube's health. Fig 1 shows the basic idea.
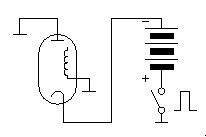
Fig 1. Principle of pulsed TWT testing
In fact, only the helix supply
has to be switched since the TWT will then switch its own collector current:

Fig 2. Separate supplies for helix and collector
The switch is connected with its negative side to ground. This way a
tube (or maybe a string of transistors) can be used as the switch. This
causes some problems with the capacitor charging supply, which must float.
The switch is controlled by a monostable multivibrator which determines the
pulse width. If a suitable storage oscilloscope is available, it can be
triggered by a debounced pushbutton in a single shot way. Otherwise, a low
frequency (tens of Hz) oscillator can trigger it periodically so that any
oscilloscope can be used to view the pulses. The duty cycle shold be kept
below 0.1% to keep the average power requirement and dissipation low.
3. SUPPLYING THE COLLECTOR(S)
Because of the huge dissipation margin, the stages of a multi collector tube
can be connected together and operated at the first collector's voltage.
With continous operation this is not allowed, because the last collector
would take most of the current and overheat.
When pulsed, the collector(s) can even be operated at helix
voltage (fig 1), however a separate energy storage capacitor is still
desirable to reduce the voltage drop on the helix during the pulse. Both can
be fed from the same supply, with a resistor between them for decoupling.
In the repetitive pulse regime, this resistor can be
dimensioned so that the voltage drop across it will give the correct collector
voltage. In single-shot mode a full voltage divider (add R2 across the
collector capacitor - fig 3) is required for that purpose. Observe the power
and voltage ratings of the resistors! Collectors are not very sensitive about
their voltage as long as it is above the minimum required.

Fig 3. Common supply for helix and collector
The collector current is not accesible at ground potential, but since it is pulsed, a small (well insulated) current transformer can be used to measureit (fig 3).
4. STORAGE CAPACITORS
Their capacitance is determined by the voltage drop that can be tolerated
during the pulse. The basic equation is
dU/dt = I/C
and therefore
C = I*dt/dU.
For example, a 50V drop during a 100us pulse at 100mA load current gives
C = 0.1*0.0001/50 = 2E-7 or 200nF (0.2uF).
Since the helix requires a more constant voltage but draws less current than the collector, a similar value of capacitor can be used for both.
5. THE SWITCH
I have used a PL519 pentode that once served for TV line deflection. It is
specified for up to 8kV of pulsed anode voltage. Since here the voltage is
present across the tube most of the time (it's the current that is pulsed),
I'm afraid it will flash over one day. On the other side, the current and
dissipation in this circuit are far below the tube's maximums.
This is a "P" series tube, built for 300mA series connected heaters. It's a
bigger tube, so it needs 40V filament voltage at 300mA. I used a 20+20V
transformer and derived all the required volotages (40V filament, +12 for the
solid state circuits, +200 for second grid and -100V for first grid) from it:

Fig 4. Modulator power supply
A simple circuit with two 555's provides a pulse train to drive the PL519:

Fig 5. Pulse modulator
The bottom one is connected in astable mode and can be set with the
"freq." potentiometer between cca 2 and 20Hz, to enable viewing of the
pulse waveforms on a non-storage oscilloscope. It triggers the upper one,
which is wired as a one-shot and determines the width of the pulse, which
can be set with the "width" potentiometer between cca 5 and 100 microseconds.
The three transistors amplify the pulses and shift the levels to values
appropriate for driving g1 and g2 of the PL519.
 Fig 6. A photo of the prototype modulator
I soon found out that at g1=-100V and g2=+200V, the PL519 starts to 'leak'
current at about 2kV of anode voltage. On the other side, with g1=0V and
g2=0V it won't open fully. That's why I added the circuit for g2 modulation.
So the tube is operated with g1=-100V, g2=0V for cutoff and g1=0V, g2=200V
for conduction. Maybe with -200V bias for g1 it could be operated with g2
fixed at +200V.
6. THE LOW CURRENT SUPPLY
The only non-trivial demand on the HV supply for charging the energy
storage caps is that it must be floating (well insulated transformer). It is
nice if it's regulated, but not mandatory. If one monitors the voltage with
a suitable HV voltmeter, even a variac/neon transformer + rectifier combo
can be used.
7. GRIDS AND ANODES
Usually, the TWTs have some extra electrodes between cathode and helix. The
required voltages vary widely, but luckily the current consumption is low.
That means one can use simple resistive dividers. Manufacturers mostly
specify that at switch on, these voltages must rise in proportion with the
helix voltage, or else must come up last. If the divider is connected as
shown in fig 7, the voltages will rise proportionally. The current
through the resistors will flow only during the pulse.

Fig 7. Grid voltage divider
To prevent the stray
capacitances of the wires and electrodes to influence the shape of the
voltages, the resistance of the divider should be relatively low. Since
current flows only during the short pulse, the power rating of the resistors
is not the problem, provided they can stand the voltage (flashover). The
lower limit on their resistance is set by the droop they would cause on the
helix capacitor voltage during the pulse.
Alternatively, one could add a small capacitor between grid and cathode to
delay the voltage rise on the grid.
In some tubes, the beam can be turned on and off by a single grid. In that
case, one can eliminate the big modulator for the helix voltage and make
only a small one for the modulating grid, with the helix voltage
permanently applied to the tube. The problem is that the grid modulator
has to work close to cathode potential. Perhaps a pulse transformer could be
used.
8. HOW TO USE IT
Switch on the TWT heater. This is usually 6.3V, up to a few amps for
bigger tubes. Use a well insulated transformer, since it must withstand
the full helix voltage between primary and secondary!
Also try to reduce stray capacitances here (short wires etc).
Wait for the prescribed warm up time (a few minutes typically).
Connect an oscilloscope to monitor at least the helix current and
desirably the collector current on a second scope channel.
Initially, I intended the 10 ohm resistor in the cathode of PL519
for helix current monitoring, but sometimes the G2 current of PL519
will distort the picture, so it's necessary to put a separate resistor
in the helix (ground) lead of the TWT to monitor the helix current.
Apply the high voltage and switch on the modulator. If you have a
(digital) storage oscilloscope, turn on the modulator at lowest frequency
for just a few pulses (the 'STOP' switch, Fig 5).
If the tube is OK, the helix current should be something like fig 8 below

Fig 8. Helix current shape
and you should have full collector current. The 'horns' on the helix
current pulse are caused partly by stray capacitances and partly because
of poor focusing during the rise time of the voltages.
These horns can be several times higher than the maximum allowed helix
current, but that's normal - don't worry about them.
The steady state helix current, which is important in CW operation of the
tube equals the midpoint 'valley' value of the waveform. If the valley
isn't flat in the middle, try lengthening the pulse. If you have a
suitable HV oscilloscope probe, also check the rise time of the voltages
to see if they are ok (less than 1/4 of the pulse width) and when the
current overshoot should end.
When tuning up the tube DC-wise, your goal is to get most of the electrons
through the tube to the collector - that means the lowest possible
midpoint helix current. Most of the cathode current should end as the
collector current, which should be close to the specified value for the
tube. If the currents aren't what they should be, try varying the
voltages and applying magnets to the (cathode end of the) tube. Changing
the heater voltage could also help.
If you manage to get good values for the currents, then you can apply RF.
Use a suitable coupler at the output which will give you cca 10..100mW
of peak power and a diode detector connected to an oscilloscope to
monitor power. The detector can be calibrated usin low power CW RF and
DC coupling on the scope.
9. CONCLUSION
A reatively simple circuit, using mostly off the shelf components enables
one to do many measurements on TWT's, including ones that are not possible
or safe for the tube with normal power supply in continous regime. This
includes reviving and refocusing of old and/or damaged tubes. By using short
pulses, one can also avoid thermal and RF loading problems and test high power
tubes with a small low-current HV supply.
10. LITERATURE
[1] Jim Vogler WA7CJO: Optimizing TWT Power Output for Narrow Band
CW-SSB Operation, Proceedings of the 9th int. EME conference, Ro de Janeiro 2000.
[2] Marko Cebokli S57UUU: A TWT Power Supply, Proceedings of the 7th
int. EME conference, Washington DC 1996
Up to S57UUU EME Page
Copyright info