This is based on a CT1DMK design, with the anode cavity recalculated from rectangular to cylindrical shape. The idea was to make a mechanically and thermally stable design using thick walled standard metric copper tubing.
The prototype shown on the photos was built and tested by Pavle, S57RA.
At 2.5kV anode voltage and with good air cooling, it puts out 250W easily with about 12dB of gain. It can be pushed up to 500W output, but thermal stability becomes a problem. Maybe water cooling would help here, but I suspect that cathode cooling would also need to be improved. (More and bigger holes in parts E and J, different spacer I.)
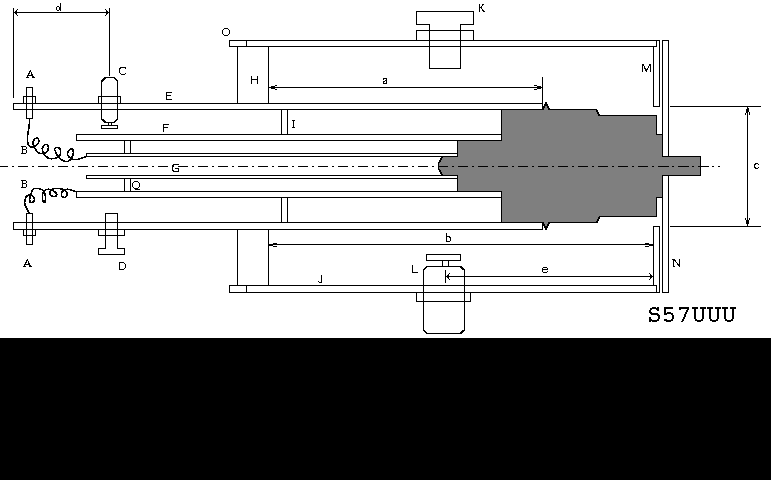
PARTS LIST AND DESCRIPTION: (see figures)
A 1nF feed throughs for cathode and filament.
B Quarter wavelength chokes for cathode and filament. Two 6cm pieces of 0.6mm Cul wire.
C Input connector (BNC female). Coupling plate diameter 8mm. d=31mm.
D Input (cathode) tuning screw. M6 copper (brass) screw.
E Grid line. 40/36mm (o.d./i.d.) copper tube, 174mm long. To fit the tube (GI-7), make 8..12 slits with holes (see fig..). The holes also serve for air flow (cathode cooling). Too many too big holes here could cause oscillation.
F Cathode line. 20/18mm copper tube, 140mm long.
G Filament line. 10/7mm copper tube, 122mm long.
H Anode cavity base plate. Turned from 10mm thick copper plate, soldered to part E. M76x1 thread on the outside. a=87mm.
I Insulating spacer for cathode line. 6mm PTFE with holes for ventilation. The idea was to place this at the voltage node (a quarter wavelength from the open end), but there is no real open circuit at the end of cathode line (bias chokes, input coupling, tuning etc.). Put it some 4..5cm from open end. Maybe this should be replaced by radial fins, to improve air circulation.
J Anode cavity. 80/74mm copper tube, 122mm long. M76x1 inner thread at the bottom end, cca 12mm deep. Inner length of cavity b=118mm, can be adjusted a few mm. Make some holes around the top for air flow (see fig...)
K Anode tuning screw. M10 copper or brass, finer thread desirable.
L Output connector (N female). Coupling plate diameter 10mm. e=66mm.
M Anode cavity top plate. Turned from 3mm copper plate, soldered to part J. c=34mm.
N Anode bypass capacitor plate. Turned (cut) from 3mm thick copper plate.
O Fixing ring. Made from 80/74mm copper tube 8mm long, M76x1 inside thread. Tighten this firmly, as this is the maximum current end of the cavity.
P Anode bypass capacitor insulation. 0.5mm PTFE.
Q Heater line spacer. Material and position not important, as there is no RF here.
Some of the parts have to be made on a lathe, and that's sometimes not very popular with HAMs. I know that everybody does not have a lathe, but I suspect that almost everybody knows somebody that does have it. I think the mechanical versatility gained by having the cavity srew-on is worth the price.
73, Marko S57UUU.
This is how it looks from outside:

Grid line exposed (anode cavity removed):

Anode cavity from top:

Anode cavity from below:

Bottom view of cathode cavity:

Exploded view, part 1:

Exploded view, part 2:

Water cooling cap:
